HEI Harness Installation
By King6fab
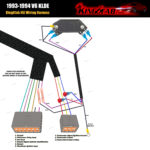
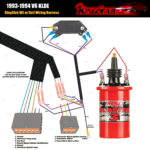
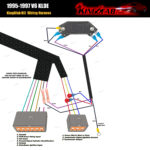
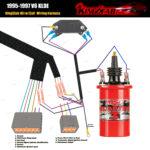
Pictures are in Ultra High Resolution, Please select your year and download diagram.
Installing HEI with Coil
The King6fab HEI harness is built to simplify wiring and provide fool proof installation. Each HEI harness build with external coil leads has a 1k resistor built in to adapt to the factory tachometer.
Important Notes: If you are adding the HEI + Coil as a result to guess at fixing a prior OEM ignition failure, This modification is not a “cure all” and the problem you may be having might not be distributor related. Please take the proper steps to diagnosis your ignition failure to ensure your ecu is triggering your distributor and has constant power with ignition on and constant ground.

Begin by unplugging both plugs on your distributor, pull the harness attached to the plugs towards you to gain easier working room. It may be required to unplug additional component’s such as the Fuel Pressure Regulator solenoid and fuel rails to allow the harness to come out more.

On the Large Distributor 6 pin Plug (plug A), use a utility knife to carefully cut away the sleeving 4-6″ back to expose the wires. Once the wires are exposed, cut the wires behind Pin 5 and Pin 6 about 3″ back from the plug. This will allow enough wiring to reconnect them if you choose to return back to OEM at a later date. Now you may begin connecting your King6fab HEI harness, Following the diagram Black will connect to the wire originally going to pin 5. The black wire with the ring type terminal will connect to the engine block. Purple will connect the wire originally going to pin 6. Strip away the plastic from each wire approximately 3/8″,Twist the copper wire to contain its strands. Slide the pink splicing connector over the wire so that copper strands are now deep into the middle portion of the splice. Use a crimping tool on the splice connector to secure the connection. On the outer ends of the splice connector, use a butane torch on low setting, or a lighter to shrink the end down on to the wire creating a permanent connection.

On the Small Distributor 3 pin Plug (plug B) use a utility knife to carefully cut away the sleeving 4-6″ back to expose the wires. Once the wires are exposed, cut the wires behind Pin 5 and Pin 6 about 3″ back from the plug. This will allow enough wiring to reconnect them if you choose to return back to OEM at a later date. Now you may begin connecting your King6fab HEI harness using the diagram for your appropriate vehicle year. Strip away the plastic from each wire approximately 3/8″,Twist the copper wire to contain its strands. Slide the pink splicing connector over the wire so that copper strands are now deep into the middle portion of the splice. Use a crimping tool on the splice connector to secure the connection. On the outer ends of the splice connector, use a butane torch on low setting, or a lighter to shrink the end down on to the wire creating a permanent connection.
If you are unsure about the exactness of your year or your vehicle was modified with a different year distributor, then reference to the distributor design. On 1993-1994 Distributors both plug A and B connect horizontally on the distributor. On 1995-1997 Distributors, plug A connects horizontally and Plug B connects vertically into the center body portion of the distributor.

If you are not adding an External coil, skip to step 5. Connect the External coil, The Blue wire goes to the Positive lead of the coil, and the Red wire goes to the negative lead of the coil.

Connect your HEI, it important to take extra care that your HEI module is mounted to a bare metal surface to ensure maximum head sink for the best trouble free results. The blue wire connects to output B on the HEI. The red wire connects to output C on the HEI. The purple wire connects to output G on the HEI. The black wire connects to output W on the HEI. The remaining black wire with an attached ring terminal will be attached to either one of the mounting bolts used to secure the HEI.

Roll the sleeving from step 2 & 3 over the crimp connections and use electrical tape or the included zipties to secure the sleeving. Use the included zip ties to secure your King6fab HEI harness to the existing car wiring so that it cannot vibrate and chafe against any sharp parts or hot surfaces. You are now done and ready to start your vehicle.


