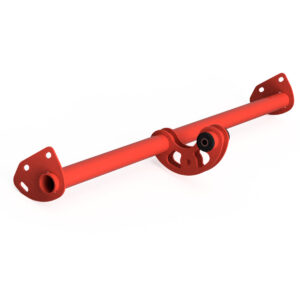
[vc_row][vc_column][special_heading title=”King6fab Lateral Arm Installation” subtitle=”” align=”center” border=”inline”][/vc_column][/vc_row][vc_row][vc_column][vc_single_image image=”3346″][vc_column_text]Wheel chock the front tires. Jack up the rear of the car via the center of the sub-frame. Place jack stands on each side of the car so that the entire rear sub-frame is accessible. Leave the Jack under the center of the sub-frame.[/vc_column_text][/vc_column][/vc_row][vc_row][vc_column][vc_single_image image=”3347″][vc_column_text]Remove both rear tires, remove the E-brake cable from brake calipers, unbolt the cable from the trailing arms. Now unbolt the trailing arms from the hub assembly. (*if your replacing the trailing arms with K6F arms, remove them entirely at this point) Using a Paint marker or sharpie, draw a line on the aligning bolts (upper lat arm hardware) indicating the current alignment position.[/vc_column_text][/vc_column][/vc_row][vc_row][vc_column][vc_single_image image=”3348″][vc_column_text]Unbolt the lateral arms from the hub assembly. These often are seized into the hub and may require a combination of heating, penetrating oil and taping back and forth with a hammer to get them dislodged. If you bought the new hardware with your lat arms, you simply can cut out the old with out worry. At last resort to remove them safely, they may need to be pressed out, this involves removing the hubs from the struts, and placing them in a press.[/vc_column_text][/vc_column][/vc_row][vc_row][vc_column][vc_single_image image=”3349″][vc_column_text]Remove the 4 anchor bolts holding the sub-frame to the chassis. Slowly drop the sub-frame down with the jack in the center.[/vc_column_text][/vc_column][/vc_row][vc_row][vc_column][vc_single_image image=”3350″][vc_column_text]Unbolt Sway bar End-links Unbolt Sway bar End-links from Lateral Arms. Unbolt the upper hardware from the lateral arms, at this point the lateral arms should be able to pull out of the sub-frame.[/vc_column_text][/vc_column][/vc_row][vc_row][vc_column][vc_single_image image=”3351″][vc_column_text]Prepare your K6F lateral arms. Each arm is Marked on an end with either R or L, R is -Right being passenger side, L is -Left being Drivers side. Also each arm is marked with a dot on one end of the tube, this dot specify’s that end faces UP when on the car. If you are using the adjustable lateral arms, These are Preset at OEM length and will need to be put on the car before adjusting[/vc_column_text][/vc_column][/vc_row][vc_row][vc_column][vc_single_image image=”3352″][vc_column_text]Assemble the arms in reverse of how you removed the OEM arms, using the same upper hardware and lower hardware. If you purchases new lower hardware, please note the 2 washers should be placed on each side of the Lat Arms, and once the bolt is tightened, some length may need to be trimmed off the bolt. Be sure to anti seize all your hardware during this install process for future repair ease.
Note the location of the alignment position on the upper hardware. If you are using the Adjustable Arms, Please note these are for professional use and will require a professional to dial in correctly for the desired use.
[/vc_column_text][/vc_column][/vc_row]